参考:https://developer.mozilla.org/zh-CN/docs/Learn/CSS/Building_blocks/Selectors/Pseudo-classes_and_pseudo-elements
伪类
伪类选择器(简称:伪类)通过冒号来定义,它定义了元素的状态,如点击按下,点击完成等,通过伪类可以为元素的状态修改样式。
:pseudo-class-name
1
2
3
4
article p :first-child {font-size : 120% ;font-weight : bold;
下面逐一详细看一下
active
在用户激活(例如点击)元素的时候匹配。这个是比较常用的。
当用鼠标交互时,它代表的是用户按下按键和松开按键之间的时间 。
1
2
3
a :active {color : red;
为保证样式生效,需要把 :active
的样式放在所有链接相关的样式之后。这种链接伪类先后顺序被称为
LVHA 顺序::link — :visited —
:hover — :active。
any-link
匹配任意一个链接的:link和:visited状态。
它会匹配每一个有 href 属性的
<a>、<area> 或
<link> 元素
1 2 3 4 :any-link {color : green;
checked
匹配处于选中状态的单选或者复选框。
用户通过勾选/选中元素或取消勾选/取消选中,来改变该元素的
:checked 状态。
1 2 3 4 5 :checked {margin-left : 25px ;border : 1px solid blue;
default
表示一组相关元素中的默认表单元素
该选择器可以在 <button>,
<input type="checkbox">,
<input type="radio">, 以及
<option> 上使用。
1 2 3 4 input :default {background-color : lime;
dir
:dir伪类选择文档中指定了语言方向的元素。换句话说,为了使用:dir伪类,需要在标记中为相关元素指定dir属性。
语言方向目前有两种:ltr(从左到右)和
rtl(从右往左)。
写这篇文章时,支持:dir伪类的只有Firefox(-moz-dir()),
1 2 3 4 <article dir ="rtl" > <p > التدليك واحد من أقدم العلوم الصحية التي عرفها الانسان والذي يتم استخدامه لأغراض الشفاء منذ ولاده الطفل.</p > </article >
1 2 3 4 5 6 7 8 9 article :-moz-dir(rtl) {color : orange;article :dir(rtl) {color : orange;
disabled
:disabled伪类选择禁用状态的表单元素
处于禁用状态的元素,不能被选中、勾选,不能获得焦点。
在下面的例子中,name输入框处于禁用状态,因此会半透明。
1 <input type ="text" id ="name" disabled >
1
2
3
:disabled {opacity : .5 ;
enabled
与disabled相反,所有表单元素默认都是启用的,除非在标记中添加了disabled属性。
通过:enabled和:disabled可以提供视觉上的反馈,改善用户体验。
1 2 3 4 input :enabled {color : blue;
看示例:http://codepen.io/ricardozea/pen/zqYQxq
empty
代表没有子元素的元素。子元素只可以是元素节点或文本(包括空格)。
只要包含一个字母、其他HTML元素,甚至一个空格,都不算空。
1 2 3 4 5 6 <div class ="box" > </div > <div class ="box" > I will be pink</div > <div class ="box" > </div >
1
2
3
4
5
6
7
8
9
.box {background : pink;height : 80px ;width : 80px ;.box :empty {background : lime;
first-child
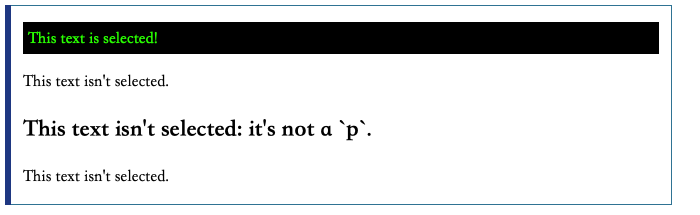
:first-child表示在一组兄弟元素中的第一个元素。这个是比较常用的。
下面的例子中,只有第一个p标签会应用到样式。
1 2 3 4 5 6 7 8 9 10 <div > <p > This text is selected!</p > <p > This text isn't selected.</p > </div > <div > <h2 > This text isn't selected: it's not a `p`.</h2 > <p > This text isn't selected.</p > </div >
1
2
3
4
5
p :first-child {color : lime;background-color : black;padding : 5px ;
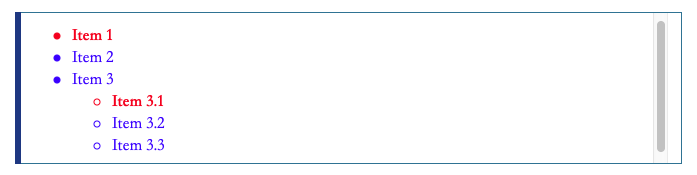
再看一个常用在ul li中的。
1 2 3 4 5 6 7 8 9 10 11 12 <ul > <li > Item 1</li > <li > Item 2</li > <li > Item 3<ul > <li > Item 3.1</li > <li > Item 3.2</li > <li > Item 3.3</li > </ul > </li > </ul >
1
2
3
4
5
6
7
8
ul li {color : blue;ul li :first-child {color : red;font-weight : bold;
last-child
代表父元素的最后一个子元素。这个是比较常用的。
1 2 3 4 5 <ul > <li > 此元素背景色不是lime</li > <li > 我的也不是lime。</li > <li > 我的才是lime! :)</li > </ul >
1
2
3
li :last-child {background-color : lime;
nth-child
首先找到所有当前元素的兄弟元素,然后按照位置先后顺序从1开始排序,选择的结果为CSS伪类:nth-child括号中表达式(an+b)匹配到的元素集合(n=0,1,2,3...)
示例:
0n+3 或简单的 3 匹配第三个元素。
1n+0 或简单的 n 匹配每个元素。(兼容性提醒:在
Android 浏览器 4.3 以下的版本 n 和 1n 的匹配方式不一致。1n 和 1n+0
是一致的,可根据喜好任选其一来使用。)
2n+0 或简单的 2n 匹配位置为
2、4、6、8...的元素(n=0时,2n+0=0,第0个元素不存在,因为是从1开始排序)。你可以使用关键字
even 来替换此表达式。
2n+1 匹配位置为
1、3、5、7...的元素。你可以使用关键字 odd 来替换此表达式。
3n+4 匹配位置为 4、7、10、13...的元素。
tr:nth-child(2n+1) 表示HTML表格中的奇数行。
tr:nth-child(odd) 表示HTML表格中的奇数行。
tr:nth-child(2n) 表示HTML表格中的偶数行。
tr:nth-child(even) 表示HTML表格中的偶数行。
span:nth-child(0n+1)
表示子元素中第一个且为span的元素,与 :first-child
选择器作用相同。
span:nth-child(1)
表示父元素中子元素为第一的并且名字为span的标签被选中
span:nth-child(-n+3)
匹配前三个子元素中的span元素。
only-child
选择父元素中唯一的子元素。
在下面的例子中,第一个ul只有一个子元素,因此该子元素将变成橙色。第二个ul有多个子元素,因此其子元素不会受:only-child伪类影响。
1 2 3 4 5 6 7 8 <ul > <li > This text will be orange.</li > </ul > <ul > <li > Lorem ipsum dolor sit amet.</li > <li > Lorem ipsum dolor sit amet.</li > </ul >
1
2
3
ul :only-child {color : orange;
first-of-type
选择父元素容器内任意类型子元素的第一个元素。
在下面的例子中,第一个li元素和第一个span元素的文本才是橙色的。
1 2 3 4 5 6 <ul > <li > This text will be orange.</li > <li > Lorem ipsum dolor sit amet. <span > This text will be orange.</span > </li > <li > Lorem ipsum dolor sit amet.</li > </ul >
1
2
3
ul :first-of-type {color : orange;
last-of-type
:last-of-type伪类选择父元素容器内任意类型子元素的最后一个元素。
1
2
3
p em :last-of-type {color : lime;
1 2 3 4 5 6 7 8 9 10 11 12 13 14 15 16 17 18 19 <p > <em > 我没有颜色 :(</em > <br > <strong > 我没有颜色 :(</strong > <br > <em > 我有颜色 :D</em > <br > <strong > 我也没有颜色 :(</strong > <br > </p > <p > <em > 我没有颜色 :(</em > <br > <span > <em > 我有颜色!</em > </span > <br > <strong > 我没有颜色 :(</strong > <br > <em > 我有颜色 :D</em > <br > <span > <em > 我在子元素里,但没有颜色!</em > <br > <span style ="text-decoration:line-through;" > 我没有颜色 </span > <br > <em > 我却有颜色!</em > <br > </span > <br > <strong > 我也没有颜色 :(</strong > </p >
focus
:focus表示获得焦点的元素(如表单输入)。当用户点击或触摸元素或通过键盘的
“tab” 键选择它时会被触发。
在表单里使用得非常多。
1 2 3 4 input :focus {color : red;
focus-within
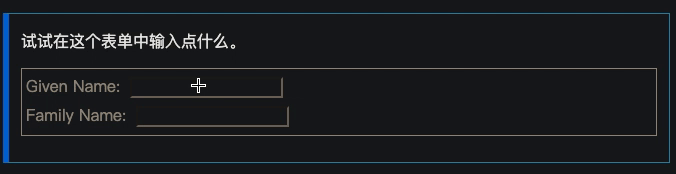
表示一个元素获得焦点,或,该元素的后代元素获得焦点。换句话说,元素自身或者它的某个后代匹配
:focus 伪类。
该选择器非常实用。举个通俗的例子:表单中的某个
<input> 字段获得焦点时,整个表单的
<form> 元素都可被高亮。
此例子中,当表单某个文本输入框获得焦点后,表单会被设置颜色样式。
1 2 3 4 5 6 7 8 9 <p > 试试在这个表单中输入点什么。</p > <form > <label for ="given_name" > Given Name:</label > <input id ="given_name" type ="text" > <br > <label for ="family_name" > Family Name:</label > <input id ="family_name" type ="text" > </form >
1
2
3
4
5
6
7
8
9
10
11
12
13
14
form {border : 1px solid;color : gray;padding : 4px ;form :focus-within {background : #ff8 ;color : black;input {margin : 4px ;
hover
在用户指针悬停时生效。而且它不只可以用于链接,:hover伪类可以任何伪元素上使用。这个是比较常用的。
1
2
3
a :hover {color : orange;
看示例:https://codepen.io/ricardozea/pen/vGEzJK
indeterminate
:indeterminate伪类选择单选按钮或复选框在页面加载时没有被勾选的。
比如,页面加载后,一组单选按钮中没有默认或预先勾选的,或者一个复选框已经通过JavaScript设置为indeterminate状态。
1 2 3 4 5 6 7 8 9 <div > <input type ="checkbox" id ="checkbox" > <label for ="checkbox" > Background should be green</label > </div > <div > <input type ="radio" id ="radio" > <label for ="radio" > Background should be green</label > </div >
1
2
3
4
var inputs = document .getElementsByTagName("input" );for (var i = 0 ; i < inputs.length; i++) {true ;
1
2
3
4
5
6
7
input , span {background : red;:indeterminate , :indeterminate + label {background : lime;
页面一进来的时候:
选中之后:
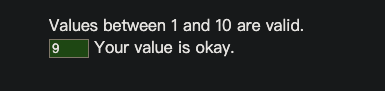
in-range
代表一个 <input> 元素,其当前值处于属性
min 和 max 限定的范围之内.
out-of-range
表示一个 <input> 元素,其当前值处于属性
min 和 max 限定的范围外。
1 2 3 4 5 6 7 8 9 <form action ="" id ="form1" > <ul > Values between 1 and 10 are valid.<li > <input id ="value1" name ="value1" type ="number" placeholder ="1 to 10" min ="1" max ="10" value ="12" > <label for ="value1" > Your value is </label > </li > </ul > </form >
1
2
3
4
5
6
7
8
9
10
11
12
13
14
15
16
17
18
19
20
21
22
23
24
25
li {list-style : none;margin-bottom : 1em ;input {border : 1px solid black;input :in-range {background-color : rgba (0 , 255 , 0 , 0.25 );input :out-of-range {background-color : rgba (255 , 0 , 0 , 0.25 );border : 2px solid red;input :in-range + label ::after {content : 'okay.' ;input :out-of-range + label ::after {content : 'out of range!' ;
当input在范围当时候:
当input不在范围当时候:
invalid
:invalid伪类选择输入格式不符合要求的表单元素。这个伪类对于突出显示用户的字段错误非常有用。
在下面的例子中,email输入框中的电子邮箱格式不正确,因此这个输入框会被认为无效,将出现橙色边框:
1
2
3
input [type=email] :invalid {background : orange;
看示例:http://codepen.io/ricardozea/pen/bEzqVg
valid
CSS 伪类表示内容验证正确的 <input> 或其他
<form>
元素。这能简单地将校验字段展示为一种能让用户辨别出其输入数据的正确性的样式。
该伪类对于高亮正确字段是很有用的。
1 2 3 4 input :valid {background-color : powderblue;
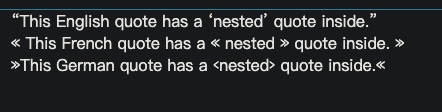
lang
基于元素语言来匹配页面元素。
通过lang=""属性、相应的meta元素以及HTTP首部的协议信息来确定。
lang=""属性常用于html标签,其实也可以用于其他标签。
下面看看怎么通过CSS来添加引用标记。
1 2 3 4 5 6 7 8 9 10 11 12 <div lang ="en" > <q > This English quote has a<q > nested</q >quote inside.</q > </div > <div lang ="fr" > <q > This French quote has a<q > nested</q >quote inside.</q > </div > <div lang ="de" > <q > This German quote has a<q > nested</q >quote inside.</q > </div >
1
2
3
:lang(en) > q { quotes : '\201C' '\201D' '\2018' '\2019' ; }:lang(fr) > q { quotes : '« ' ' »' ; }:lang(de) > q { quotes : '»' '«' '\2039' '\203A' ; }
link
:link伪类选择器是用来选中元素当中的链接。它将会选中所有尚未访问的链接,包括那些已经给定了其他伪类选择器的链接(例如:hover选择器,:active选择器,:visited选择器)。
visited
表示用户已访问过的链接。出于隐私原因,可以使用此选择器修改的样式非常有限。
1 2 3 4 a :visited {color : green;
is
CSS 伪类
函数将选择器列表作为参数,并选择该列表中任意一个选择器可以选择的元素。
1 2 3 4 5 6 7 8 9 10 11 12 13 :is(header , main , footer ) p :hover {color : red;cursor : pointer;header p :hover ,main p :hover ,footer p :hover {color : red;cursor : pointer;
:is() 伪类可以大大简化CSS选择器。例如,下面的CSS:
1 2 3 4 5 6 7 8 9 10 11 12 13 14 15 ol ol ul , ol ul ul , ol menu ul , ol dir ul ,ol ol menu , ol ul menu , ol menu menu , ol dir menu ,ol ol dir , ol ul dir , ol menu dir , ol dir dir ,ul ol ul , ul ul ul , ul menu ul , ul dir ul ,ul ol menu , ul ul menu , ul menu menu , ul dir menu ,ul ol dir , ul ul dir , ul menu dir , ul dir dir ,menu ol ul , menu ul ul , menu menu ul , menu dir ul ,menu ol menu , menu ul menu , menu menu menu , menu dir menu ,menu ol dir , menu ul dir , menu menu dir , menu dir dir ,dir ol ul , dir ul ul , dir menu ul , dir dir ul ,dir ol menu , dir ul menu , dir menu menu , dir dir menu ,dir ol dir , dir ul dir , dir menu dir , dir dir dir {list-style-type : square;
可以被替换为:
1 2 3 4 5 6 :is(ol , ul , menu , dir ) :is(ol , ul , menu , dir ) ul ,:is(ol , ul , menu , dir ) :is(ol , ul , menu , dir ) menu ,:is(ol , ul , menu , dir ) :is(ol , ul , menu , dir ) dir {list-style-type : square;
但是,不要像下面那么做
1
2
3
:is(ol , ul , menu , dir ) :is(ol , ul , menu , dir ) :is(ul , menu , dir ) {list-style-type : square;
not
:not()
用来匹配不符合一组选择器的元素。由于它的作用是防止特定的元素被选中,它也被称为反选伪类(negation
pseudo-class)。
注意:
:not() 伪类不能被嵌套,这意味着
:not(:not(...)) 是无效的。由于伪元素不是简单的选择器,他们不能被当作 :not()
中的参数,形如 :not(p::before)
这样的选择器将不会工作。
可以利用这个伪类写一个完全没有用处的选择器。例如,
:not(*)
匹配任何非元素的元素,因此,这个规则将永远不会被应用。
可以利用这个伪类提高规则的优先级。例如, #foo:not(#bar)
和 #foo 会匹配相同的元素,但是前者的优先级更高。
:not(.foo) 将匹配任何非 .foo 的元素,包括
<html> 和 <body>。这个选择器只会应用在一个元素上,无法用它来排除所有父元素。比如,
body :not(table) a 依旧会应用到表格元素
<table> 内部的 <a> 上, 因为
<tr> 将会被 :not(table)
这部分选择器匹配。
1 2 3 4 :not(p) {color : blue;
:not()
伪类可以将一个或多个以逗号分隔的选择器列表作为其参数。选择器中不得包含另一个否定选择符或
伪元素。
1
2
3
4
5
6
7
8
9
10
11
12
13
14
15
16
17
18
19
20
21
22
23
24
.fancy {text-shadow : 2px 2px 3px gold;p :not(.fancy) {color : green;body :not(p) {text-decoration : underline;body :not(div) :not(span) {font-weight : bold;body :not(.crazy , .fancy ) {font-family : sans-serif;
optional
:optional伪类选择表单中非必填的输入字段。换句话说,只要输入字段中没有required属性,就会被:optional伪类选中。
在下面的例子中,这个数值字段是可以选填的,因此其中的文本将为灰色。
1
2
3
:optional {color : gray;
playing
匹配代表音频、视频或者相似的能“播放”或者“暂停”的资源的,且正在“播放”的元素。
paused
匹配代表音频、视频或者相似的能“播放”或者“暂停”的资源的,且正在“暂停”的元素。
read-only
匹配用户不可更改的元素。
read-write
匹配用户可更改的元素。
required
匹配必填的form元素。
注意::optional伪类选中'可选的'表单字段。
root
这个 CSS 伪类匹配文档树的根元素。对于 HTML
来说,:root 表示 <html>
元素,除了优先级更高之外,与 html 选择器相同。
在声明全局 CSS 变量时 :root 会很有用:
1
2
3
4
:root {--main-color : hotpink;--pane-padding : 5px 42px ;
伪元素
伪元素开头为双冒号::
::pseudo-element-name
1
2
3
4
article p ::first-line {font-size : 120% ;font-weight : bold;
after
::after用来创建一个伪元素,作为已选中元素的最后一个子元素。通常会配合content属性来为该元素添加装饰内容。这个虚拟元素默认是行内元素。
当然,通过这个伪元素添加的任何内容都无法通过其他选择符选中。
1
2
3
4
h1 :after {content : ", Web Designer!" ;color : green;
结果如下:
接下来的示例展示了用::after伪元素,attr()CSS表达式和一个自定义数据属性
data-descr 创建一个纯CSS, 词汇表提示工具。在单独页面 看这个例子。
1 2 3 4 5 <p > 这是上面代码的实现<br /> <span data-descr ="collection of words and punctuation" > 文字</span > 有一些<span data-descr ="small popups which also hide again" > 提示</span > 。<br /> <span data-descr ="not to be taken literally" > 看看</span > .</p >
1
2
3
4
5
6
7
8
9
10
11
12
13
14
15
16
17
18
19
20
21
span [data-descr] {position : relative;text-decoration : underline;color : #00F ;cursor : help;span [data-descr] :hover ::after {content : attr (data-descr);position : absolute;left : 0 ;top : 24px ;min-width : 200px ;border : 1px #aaaaaa solid;border-radius : 10px ;background-color : #ffffcc ;padding : 12px ;color : #000000 ;font-size : 14px ;z-index : 1 ;
before
::before
创建一个伪元素,其将成为匹配选中的元素的第一个子元素。常通过
content
属性来为一个元素添加修饰性的内容。此元素默认为行内元素。
我们可以用几乎任何方法定义 content
中的文字和图片样式。
1 <span class ="ribbon" > Notice where the orange box is.</span >
1
2
3
4
5
6
7
8
9
10
.ribbon {background-color : #5BC8F7 ;.ribbon ::before {content : "Look at this orange box." ;background-color : #FFBA10 ;border-color : black;border-style : dotted;
first-letter
:first-letter伪元素选择一行文本第一个字符。
如果相应行前面包含图片、视频或表格元素,那么不会影响选择第一个字符。
这个伪元素非常适合对段落进行排版,有了它就不必用图片或其他技巧了。
提示:
这个伪元素也可以选中:before伪元素生成的第一个字符。
1
2
3
h1 :first-letter {font-size : 5em ;
first-line
:first-line选择元素的第一行,只适用于块级元素,行内元素不适用。
即使一段文本有多行,也会选中第一行。
1 2 <p > Lorem ipsum dolor sit amet, consectetur adipisicing elit,</p >
1 p ::first-line { text-transform : uppercase }
selection
CSS伪元素应用于文档中被用户高亮的部分(比如使用鼠标或其他选择设备选中的部分)。
1
2
3
::selection {background-color : cyan;
只有一小部分CSS属性可以用于::selection 选择器:
colorbackground-colorcursorcaret-coloroutline and its longhandstext-decoration and its associated propertiestext-emphasis-colortext-shadow